
Delicious Cookie Monster Cheesecake
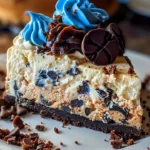
Delicious Cookie Monster Cheesecake is a delightful dessert that transforms the classic cheesecake into a fun and whimsical treat that evokes joy in both kids and adults alike. With its vibrant blue frosting and playful cookie eyes, this cheesecake isn’t just delicious; it’s a feast for the eyes! Imagine sinking your fork into a creamy, velvety layer of cheesecake, topped with a crisp, chocolatey crust and chunks of cookie that deliver a delightful crunch. Whether it’s a birthday party, a family gathering, or a simple weekend treat, this cheesecake is sure to impress all your guests. With a straightforward, step-by-step recipe, you’ll have this delectable dessert on the table in no time.
Why You’ll Love This Recipe
There are countless reasons to adore this Cookie Monster Cheesecake. First and foremost, it’s easy to prepare, requiring minimal cooking skills even for novice bakers. This recipe combines simple ingredients found in most pantries, making it a crowd-pleaser without breaking the bank. As an added bonus, it’s a great opportunity for family bonding time in the kitchen, allowing young ones to get involved in the mixing, pouring, and decorating. It brings out the inner child in everyone, making it an excellent choice for family gatherings or celebrations. Plus, its bold and whimsical appearance will be the star of the dessert table, delighting everyone who lays eyes on it.
Ingredients
Gather the following ingredients to create your own Delicious Cookie Monster Cheesecake:
- 1 1/2 cups crushed chocolate sandwich cookies: Adding a rich, chocolatey crunch.
- 1/4 cup sugar: For a hint of sweetness that balances the flavors.
- 1/2 cup butter, melted: Contributing moisture and richness to the crust.
- 4 packages (8 oz each) cream cheese, softened: This ingredient forms the creamy, dreamy base of the cheesecake.
- 1 cup sugar: Enhancing the sweetness in the cream cheese mixture.
- 1 cup sour cream: Adding a tangy flavor that complements the sweetness.
- 4 large eggs: Providing structure and creaminess to the cheesecake.
- 1 teaspoon vanilla extract: For a warm aroma that enhances the overall flavor.
- 1 cup crushed chocolate sandwich cookies: To mix into the cheesecake for added texture.
- 1/2 cup mini chocolate chips: Giving bursts of rich chocolatey goodness.
- Blue frosting: To create the fun Cookie Monster theme on top.
- Large cookie eyes: For a playful finishing touch to your cheesecake.
- Additional chocolate sandwich cookies for topping: Adding to the whimsical design and extra crunch.
Step-by-Step Directions
Preheat the Oven: Begin by preheating your oven to 325°F (165°C). Grease a 9-inch springform pan with a light coating of butter or non-stick spray to ensure easy removal later.
Make the Crust: In a medium bowl, mix the crushed chocolate sandwich cookies, sugar, and melted butter together until they form a sandy texture. Press this mixture firmly into the bottom of the prepared pan, creating an even layer for the crust.
Prepare the Filling: In a large mixing bowl, beat the softened cream cheese and sugar until the mixture is smooth and creamy. Gradually add the sour cream, mixing until well incorporated. Then, add the eggs one at a time, beating thoroughly after each addition. Finally, stir in the vanilla extract, crushed cookies, and mini chocolate chips to distribute them evenly throughout the cheesecake filling.
Combine and Bake: Carefully pour the cheesecake filling over the crust in the springform pan. Spread it evenly with a spatula. Bake in the preheated oven for 60-65 minutes, or until the center is set and the edges have a slight puff.
Cool and Set: Once baked, remove the cheesecake from the oven and let it cool on a wire rack for about 10 minutes. Use a knife to gently run around the edge of the pan to loosen the cheesecake. Allow it to cool completely before removing the sides of the springform pan to avoid any cracks.
Decorate: Once the cheesecake has cooled, frosted the top with blue frosting to resemble Cookie Monster’s fur. Adorn the frosted surface with large cookie eyes and additional chocolate sandwich cookies to complete the look and add a touch of fun.
Tips & Tricks
- Room Temperature Ingredients: Ensure that your cream cheese is softened to room temperature for a smoother batter. Cold cream cheese can create lumps that will affect the final texture.
- Baking in a Water Bath: For an even creamier cheesecake, you can bake it in a water bath by wrapping the outside of the springform pan with foil and placing it in a larger pan filled with hot water. This helps prevent cracking and promotes even baking.
- Let It Set: For the best texture, let the cheesecake chill in the fridge for at least four hours, but overnight is ideal.
- Flavor Variations: Feel free to experiment with different flavors of frosting or even a flavored cheesecake base. Mint chocolate chip or peanut butter swirls could be fun additions.
Serving Suggestions & Pairings
This Cake Monster Cheesecake shines on its own, but it can also be paired with a variety of accompaniments. Serve it alongside fresh berries for a pop of color and a hint of tartness that contrasts the richness of the cheesecake. A scoop of vanilla ice cream on the side can elevate the dessert experience, making it even more indulgent. Ideal for festive occasions, birthday parties, or family gatherings, this cheesecake adds joy and cheer to any celebration.
Nutritional Information
While this dessert is undoubtedly a treat, moderation is key. Each slice of Cookie Monster Cheesecake typically contains around 350-450 calories, depending on the serving size and topping additions. It also contains a mix of carbohydrates, fats, and proteins, offering a balanced yet indulgent dessert experience. Remember that balance is crucial—enjoying sweets on occasion can be part of a healthy lifestyle.
Storing Tips & Variations
To store any leftover cheesecake, cover it tightly with plastic wrap or aluminum foil and refrigerate. Properly stored, it will last for up to five days in the fridge. If you prefer to keep it longer, you can freeze slices. To do this, wrap each slice with plastic wrap and place them in an airtight container in the freezer. When ready to enjoy, simply thaw in the refrigerator overnight.
Variations for Your Cookie Monster Cheesecake
- Fruit Swirl: Swirl in your favorite fruit puree, like raspberry or strawberry, for a fruity twist.
- Different Frosting: Mix things up with different frosting colors or flavors. For example, a chocolate ganache topping can also create a rich, decadent look.
- Add More Cookies: For even more cookie goodness, fold in some chopped cookies into the batter. More texture equals more fun!
Conclusion
Now that you’ve discovered how to make Delicious Cookie Monster Cheesecake, it’s time to get baking! This fun and playful treat will evoke nostalgia and joy in everyone who gets a taste. The combination of creamy cheesecake and crunchy cookies with a whimsical presentation makes it an irresistible delight. So, gather your ingredients, invite the family to join in on the fun, and embark on a culinary adventure. Don’t forget to share your experience, and maybe let us know how your version turned out!
FAQs
1. Can I use a different type of cookie for the crust?
Absolutely! While chocolate sandwich cookies are traditional, you can use graham crackers or any other cookie you prefer. Just make sure to adjust the sugar content if necessary.
2. What can I substitute for cream cheese?
If you’re looking for a dairy-free option, you can use a vegan cream cheese substitute. Keep in mind that the flavor and texture might differ slightly.
3. Can I decorate the cheesecake ahead of time?
You can frost and decorate the cheesecake up to a day in advance. Just store it in the refrigerator until you’re ready to serve.
4. How can I tell when the cheesecake is done baking?
The cheesecake is done when the edges are puffed, and the center is set but slightly jiggly. It will firm up as it cools.
5. Is it necessary to cool the cheesecake slowly?
Yes, slowly cooling the cheesecake helps prevent cracks. Rapid temperature changes can cause it to crack, so allow it to cool at room temperature before refrigerating.
Cookie Monster Cheesecake
Ingredients
For the crust
- 1.5 cups crushed chocolate sandwich cookies Adding a rich, chocolatey crunch.
- 0.25 cups sugar For a hint of sweetness that balances the flavors.
- 0.5 cups butter, melted Contributing moisture and richness to the crust.
For the filling
- 32 oz cream cheese, softened This ingredient forms the creamy, dreamy base of the cheesecake.
- 1 cups sugar Enhancing the sweetness in the cream cheese mixture.
- 1 cups sour cream Adding a tangy flavor that complements the sweetness.
- 4 large eggs Providing structure and creaminess to the cheesecake.
- 1 teaspoon vanilla extract For a warm aroma that enhances the overall flavor.
- 1 cup crushed chocolate sandwich cookies To mix into the cheesecake for added texture.
- 0.5 cups mini chocolate chips Giving bursts of rich chocolatey goodness.
For decoration
- blue frosting To create the fun Cookie Monster theme on top.
- large cookie eyes For a playful finishing touch.
- additional chocolate sandwich cookies for topping Adding to the whimsical design and extra crunch.
Instructions
Preparation
- Preheat the oven to 325°F (165°C). Grease a 9-inch springform pan with a light coating of butter or non-stick spray.
- In a medium bowl, mix the crushed chocolate sandwich cookies, sugar, and melted butter together until a sandy texture forms. Press this mixture into the bottom of the prepared pan.
Filling
- In a large mixing bowl, beat the softened cream cheese and sugar until smooth and creamy.
- Gradually add the sour cream, mixing until well incorporated, then add eggs one at a time, beating thoroughly after each addition.
- Stir in the vanilla extract, crushed cookies, and mini chocolate chips.
Baking
- Pour the cheesecake filling over the crust and spread it evenly. Bake for 60-65 minutes or until the center is set.
- Remove from the oven and let it cool on a wire rack for about 10 minutes. Run a knife around the edge of the pan to loosen the cheesecake and let it cool completely.
Decorating
- Once cooled, frost the top with blue frosting and decorate with large cookie eyes and additional cookies.