
Delicious Cookie Monster Cheesecake
Indulging in a slice of Delicious Cookie Monster Cheesecake is an experience wrapped in layers of creamy, dreamy textures and vivid flavors. This recipe provides a step-by-step guide that invites you to create an eye-catching dessert that is both delightful and fun. The moment you layer the luscious, blue-hued cheesecake batter over a crunchy Oreo crust, your kitchen will be enveloped in a soothing aroma, setting the stage for a sweet adventure. With every bite, the creamy richness will meld seamlessly with the sweetness of mini chocolate chip cookies, making your taste buds dance in joy.
History / Fun Fact
The Cookie Monster Cheesecake draws its whimsical inspiration from the iconic character beloved by generations—Cookie Monster, a fuzzy blue creature from "Sesame Street." Celebrated for his insatiable love for cookies, he has captured the hearts of both children and adults alike. Just like our delightful cheesecake version, the original Cookie Monster broke the conventional mold of desserts by combining the joy of cookies with creative baking. This dessert doesn’t just evoke memories of childhood; it represents the playful spirit that comes with celebrating the little things in life, such as sharing a sweet treat with loved ones.
Ingredients
To whip up this delightful Cookie Monster Cheesecake, gather the following ingredients:
- 2 cups Oreo crumbs: These chocolatey crumbs bring a rich, buttery texture, transforming into an irresistible crust.
- 1/4 cup unsalted butter, melted: Adding moisture and a hint of richness that binds the cookie crumbs.
- 24 oz (680g) cream cheese, softened: The creamy heart of our cheesecake; it provides a luscious, velvety texture.
- 1 cup granulated sugar: Sweetness that enhances the flavors while balancing tangy notes.
- 1 cup sour cream: Adds a tangy profile that elevates the creaminess, ensuring each bite is rich yet refreshing.
- 1 teaspoon vanilla extract: The aromatic touch that rounds off the flavors harmoniously.
- 3 large eggs: They act as the binding agent, giving our cheesecake a firm yet tender consistency.
- 2 tablespoons blue food coloring: To create the playful blue color that pays homage to Cookie Monster.
- 1/2 cup mini chocolate chip cookies: Little nuggets of joy sprinkled throughout, enhancing the cheesecake’s texture.
- 1 cup white chocolate chips: For a creamy, sweet drizzle that perfectly contrasts with the chocolate crust.
- 1/2 cup heavy cream: Essential for creating a silky smooth ganache that will add a luscious touch.
- Whipped cream: For an airy topping that brings lightness to the dessert.
- Mini chocolate chip cookies, for decoration: For that playful, cookie-topped look that is simply charming.
- Blue food coloring: Just a hint to sprinkle on top for visual appeal, perfecting the Cookie Monster theme.
- Edible googly eyes: A must-have for finishing touches that can’t help but bring a smile to your face.
Cooking Time & Tips for Delicious Cookie Monster Cheesecake
When making a cookie cheesecake, you have the option of quick or slow preparation. Quick prep may include using store-bought crusts or pre-packaged cream cheese—but we recommend a heartfelt, homemade approach. A slow, step-by-step process allows flavors to develop, ensuring a truly rewarding baking experience.
Practical tips for success include ensuring all your ingredients are at room temperature before you start. This helps in achieving a smooth batter without lumps. Additionally, don’t rush the baking time; it’s crucial that the cheesecake cooks slowly so it sets perfectly and avoids any cracks on the surface.
Step-by-Step Directions
Preheat the oven to 325°F (163°C) and grease a 9-inch springform pan to ensure easy release after baking.
For the crust: In a large mixing bowl, combine Oreo crumbs with melted butter until the mixture resembles wet sand. Press this mixture firmly into the bottom of your prepared pan, creating a solid foundation. Bake for 10 minutes until slightly firm, and then let it cool.
For the cheesecake: In a separate, spacious mixing bowl, beat softened cream cheese on medium speed until smooth. Gradually add in sugar, blending until fully incorporated. Next, mix in sour cream and vanilla extract, ensuring a creamy consistency. Now, crack in the eggs one at a time, beating elegantly after each addition to keep that smooth texture. Add blue food coloring until fully combined, folding in half a cup of mini chocolate chip cookies for delightful bursts of flavor.
Pour the cheesecake batter into the cooled Oreo crust, spreading it evenly with a spatula for a polished look.
Bake for 60-70 minutes until the center is set and edges are lightly browned. The cheesecake should have a gentle jiggle in the center. Turn off the oven and leave the cheesecake to cool in the oven, with the door slightly ajar, for one hour. This helps prevent cracks.
Refrigerate the cheesecake for at least 4 hours or overnight, creating a beautifully firm texture that will hold its shape when sliced.
For the drip: In a microwave-safe bowl, heat white chocolate chips and heavy cream in 30-second intervals, stirring frequently until smooth. This creates a beautiful ganache to finish off our cheesecake.
Drizzle the white chocolate ganache over the edges of the cheesecake, allowing it to drip enticingly down the sides for a dramatic effect.
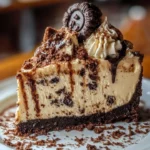
Decorate the top of your cheesecake generously with dollops of whipped cream, mini chocolate chip cookies, sprinkles of blue food coloring, and adorable edible googly eyes. This whimsical finish brings your creation to life, making it truly stand out.
Serving Suggestions & Occasions
Cookie Monster Cheesecake is a delightful centerpiece for various occasions. It’s perfect for birthday parties, family gatherings, or themed celebrations, evoking joy and nostalgia with every serving. Pair it with a scoop of vanilla ice cream for an indulgent treat, or serve it alongside fresh berries for a refreshing contrast.
Common Mistakes for Delicious Cookie Monster Cheesecake
Common pitfalls include not allowing the cream cheese to soften adequately, which can lead to a lumpy texture. Additionally, rushing the cooling process may result in cracks on the surface of the cheesecake. Always allow the cheesecake to cool in the oven with the door ajar to let it set gently.
Healthier Alternatives & Variations
For a healthier take on the Cookie Monster Cheesecake, consider using low-fat cream cheese and Greek yogurt in place of sour cream. You can also replace the sugar with natural sweeteners, like honey or maple syrup. For variations, try adding crushed nuts, or switch the Oreo crust with a graham cracker or peanut butter cookie crust for a different flavor profile.
FAQs
Can I use full-fat cream cheese?
Yes, full-fat cream cheese provides the best texture and taste for a rich cheesecake.How long does this cheesecake last in the refrigerator?
The cheesecake can be stored in the refrigerator for up to 5 days when properly covered.Can I freeze the Cookie Monster Cheesecake?
Absolutely! Wrap individual slices tightly in plastic wrap and freeze for up to 3 months.Can I make this cheesecake gluten-free?
Yes! Use gluten-free Oreos and ensure other ingredients are gluten-free as well.Is there an alternative to blue food coloring?
Yes, you can use natural food coloring made from butterfly pea powder for a unique twist.How do I know when my cheesecake is perfectly baked?
The edges should be set while the center remains slightly jiggly. It will firm up as it cools.
Conclusion
With its captivating appearance and indulgent flavors, the Cookie Monster Cheesecake is a must-try for anyone with a sweet tooth. It’s not just a dessert; it’s a playful experience that sparks joy. Why wait to whip up this delicious concoction? Gather your ingredients, and let’s embark on this baking adventure together—because who wouldn’t want to slice into this delightful treat today?
Cookie Monster Cheesecake
Ingredients
For the crust
- 2 cups Oreo crumbs Brings a rich, buttery texture.
- 1/4 cup unsalted butter, melted Adds moisture and richness.
For the cheesecake filling
- 24 oz cream cheese, softened The creamy heart of our cheesecake.
- 1 cup granulated sugar Enhances flavors.
- 1 cup sour cream Adds a tangy profile.
- 1 teaspoon vanilla extract For harmonious flavors.
- 3 large eggs Binding agent for the cheesecake.
- 2 tablespoons blue food coloring For the playful blue color.
- 1/2 cup mini chocolate chip cookies Adds texture.
For the ganache and decoration
- 1 cup white chocolate chips For drizzling on top.
- 1/2 cup heavy cream Essential for the ganache.
- Whipped cream For topping.
- Edible googly eyes For decoration.
- Blue food coloring For sprinkles on top.
Instructions
Preparing the crust
- Preheat the oven to 325°F (163°C) and grease a 9-inch springform pan.
- In a large mixing bowl, combine Oreo crumbs with melted butter until the mixture resembles wet sand.
- Press the mixture firmly into the bottom of your prepared pan and bake for 10 minutes until slightly firm. Let it cool.
Making the cheesecake filling
- In a separate bowl, beat softened cream cheese on medium speed until smooth.
- Gradually add in sugar, blending until fully incorporated.
- Mix in sour cream and vanilla extract until creamy.
- Add eggs one at a time, beating well after each addition.
- Fold in blue food coloring and half a cup of mini chocolate chip cookies.
Baking the cheesecake
- Pour the cheesecake batter into the cooled Oreo crust and spread evenly.
- Bake for 60-70 minutes until the center is set and edges are lightly browned.
- Turn off the oven and leave the cheesecake to cool inside for one hour with the door slightly ajar.
- Refrigerate for at least 4 hours or overnight.
Preparing the ganache and decorating
- In a microwave-safe bowl, heat white chocolate chips and heavy cream in 30-second intervals, stirring until smooth.
- Drizzle the ganache over the edges of the cheesecake.
- Decorate with whipped cream, mini chocolate chip cookies, blue food coloring sprinkles, and googly eyes.