
Pistachio & Raspberry Cheesecake Domes
Indulging in the delightful decadence of Pistachio & Raspberry Cheesecake Domes evokes a sensory journey that begins long before the first bite. The gentle aroma of roasted pistachios mingles with the bright, tart fragrance of fresh raspberries, creating a sweet invitation that’s hard to resist. The moment you unearth a dome from its chocolatey shell, your senses are treated to an array of creamy textures—smooth cheesecake enveloping a fruity surprise that bursts in your mouth. This recipe not only satisfies a sweet tooth but also crafts a visual masterpiece that instills joy with every layer. Follow along for a step-by-step adventure that turns your kitchen into a haven of culinary bliss.
History / Fun Fact
The art of cheesecake dates back to ancient Greece, where the first recorded recipe was served at the Olympic Games around 776 B.C. Meanwhile, the pistachio has traveled a long path, originating from the Middle East and becoming a treasured nut across cultures. The marriage of creamy cheesecakes with vibrant fruits often reflects celebration and indulgence. These Pistachio & Raspberry Cheesecake Domes embody a luxurious blend of creamy textures and fruity tang, making them the perfect dessert for any festive occasion or intimate gathering. Combining global culinary history with modern flair, these beauties bring joy both visually and on the palate.
Ingredients
- 200g cream cheese – Fresh, creamy, and velvety, a perfect base that melts in your mouth.
- 100g white chocolate, melted – Rich and smooth, imparting sweetness and a delicate texture.
- 80g pistachio paste – Aromatic and nutty, this vibrant green paste deepens the flavor profile.
- 50ml heavy cream – Silky and luscious, providing a lightness that balances richness.
- 1 tsp vanilla extract – Adding warmth and depth to the otherwise bright flavors.
- 150g fresh or frozen raspberries – Juicy bursts of tartness that cut through the sweetness.
- 2 tbsp sugar – Bringing a measure of sweetness to the fruit’s tart essence.
- 1 tbsp lemon juice – Enhancing flavors and introducing a zesty brightness.
- 1 1/2 tsp gelatin (or agar for vegetarian version) – Ensuring the perfect set for the cheesecake base.
- 1 tbsp water (to bloom gelatin) – Essential for activating gelatin’s gelling properties.
- 200g white chocolate – For glazing, creating a luxurious coating on each dome.
- 100ml heavy cream (for glaze) – To enrich the glaze and give it a silky finish.
- 2 tbsp pistachio paste (for glaze) – Adding flavor that ties the cheesecake back to its nutty roots.
- Green gel coloring (optional) – For that extra pop of color, giving the glaze a stunning visual appeal.
- Fresh raspberries – To garnish, providing a vibrant, fresh touch.
- Whole pistachios – For decoration and added crunch.
- Powdered sugar – A dusting to enhance the presentation.
- Thin shortbread or sable breton cookies – A crunchy base that provides texture beneath the creamy domes.
- Raspberry jam (optional, for extra layer beneath dome) – For a delightful surprise at the base.
Cooking Time & Tips for Pistachio & Raspberry Cheesecake Domes
Creating Pistachio & Raspberry Cheesecake Domes can be a leisurely, enjoyable process. Spending more time on each step ensures exquisite results, while a quicker approach offers convenience without sacrificing flavor. Here are some practical tips:
- For the raspberry insert, ensure the mixture is fully blended before freezing. This will prevent any graininess.
- When melting white chocolate, do it slowly to avoid seizing. A gentle touch here results in a smoother texture overall.
- For perfect domes, fill the molds carefully and allow ample time to freeze, guaranteeing a clean release.
- The glaze is crucial; let it cool to the right temperature before pouring to achieve a flawless finish.
Step-by-Step Directions
Make the raspberry insert: Begin by heating the raspberries in a saucepan over medium heat. Add sugar and lemon juice, stirring until fully combined. Once the mixture bubbles, dissolve the bloomed gelatin into it. Pour this vibrant puree into small silicone molds, then transfer them to the freezer. Allow them to freeze completely until firm—about three hours or overnight for best results.
Blend the cheesecake mixture: In a mixing bowl, combine the cream cheese, pistachio paste, vanilla extract, and melted white chocolate. Use an electric mixer for a few minutes to achieve a smooth, creamy consistency. In a separate bowl, whip the heavy cream until it forms soft peaks, then gently fold it into the cheesecake mixture, preserving the airiness.
Assemble the domes: Pour a layer of the pistachio cheesecake mixture into the dome molds, filling them halfway. Next, take the frozen raspberry inserts from the freezer and press them gently into the center of each mold, ensuring they are well positioned. Fill the remainder of each mold with cheesecake mixture and smooth the tops. Return the molds to the freezer and allow to set completely for at least four hours or overnight.
Prepare the glaze: In a saucepan, heat the heavy cream gently. Once simmering, remove from heat and stir in the white chocolate and pistachio paste until it’s completely melted and smooth. If you desire more vibrancy, add a few drops of green gel coloring. Allow the glaze to cool to about 35°C before pouring over the unmolded domes.
Unmold and glaze: Carefully release the frozen domes from their molds, placing them on a prepared shortbread base. Once all the domes are unmolded, pour the cooled glaze over each one immediately, allowing it to cascade down the sides beautifully.
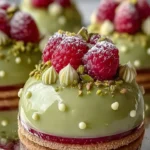
Decorate: To finish, adorn each dome with fresh raspberries, a sprinkle of whole pistachios for added crunch, and delicate dots of pistachio cream. If desired, dust with powdered sugar to create a whimsical effect. For an added layer of flavor, spread a little raspberry jam on the shortbread base before placing the dome.
Serving Suggestions & Occasions
Pistachio & Raspberry Cheesecake Domes shine at any celebration. They are ideal for birthdays, anniversaries, or simply as an exciting end to a family dinner. Serve them on a large, elegant platter for guests to admire, garnished with extra pistachios and fresh fruits. Pair these delightful domes with a glass of sparkling water or a warm cup of tea to enhance the dining experience. Perfectly sized as individual desserts, they bring a touch of sophistication to both casual and formal gatherings, ensuring that every bite is an occasion in itself.
Common Mistakes for Pistachio & Raspberry Cheesecake Domes
- Not blooming the gelatin properly: This can lead to a lumpy, uneven texture in the raspberry insert. Always ensure it is well-dissolved and fully incorporated.
- Overheating the white chocolate: Doing this can seize the chocolate, ruining its smooth consistency. Melt it gently and slowly.
- Rushing the freezing process: Quality takes time; always allow ample time for each layer, particularly the cheesecake and raspberry fillings, to set completely.
- Filling molds too full: Remember to leave room for the raspberry insert; overfilling can lead to messy domes.
- Skipping the cooling step for the glaze: Pouring the glaze too hot can lead to melting the cheesecake, ruining your aesthetic.
Healthier Alternatives & Variations
If you’re looking to make your Pistachio & Raspberry Cheesecake Domes a bit lighter, consider these alternatives:
- Opt for low-fat cream cheese or a Greek yogurt alternative for a less rich crêpe base.
- Substitute part of the white chocolate with a sugar-free variety to reduce sweetness.
- Incorporate almond flour into the base for added health benefits and a more unique crust texture.
- Use a fruit sweetener instead of sugar for the raspberry insert, like agave or honey (if dietary restrictions allow).
For variations, experiment with different berries, such as blueberries or blackberries, or swap the pistachio for another nut like almond or hazelnut for a different flavor profile.
FAQs
Can I make this recipe ahead of time?
Yes! The domes can be prepared a day or two in advance and stored in the freezer until you’re ready to glaze and serve them.How long can the domes be stored?
Once glazed, it’s best to consume them within 3-5 days. If unglazed, they can be stored frozen for up to a month.Is it possible to use a non-dairy alternative?
Absolutely! Vegan cream cheese and plant-based white chocolate can be substituted to make a dairy-free version.What can I do if I don’t have silicone molds?
You can use any dome-shaped mold or even muffin tins lined with plastic wrap as a makeshift option.Can I freeze the raspberry insert separately?
Yes! You can prepare the raspberry insert ahead of time, freeze them in advance, and add them to the cheesecakes later.How do I know when the domes are completely set?
The cheesecakes should be firm to the touch when pressed gently. If they are still soft and wobbly in the center, they need more time.
Conclusion
Let the luxurious allure of Pistachio & Raspberry Cheesecake Domes inspire your next culinary adventure. This recipe isn’t just about satisfying your sweet tooth; it’s a celebration of textures, tastes, and artistry. As you blend, mix, and mold, a sense of joy and anticipation will grow, culminating in a dessert that dazzles both the eye and the palate. So, don’t wait – gather your ingredients, clear some time in your kitchen, and create these stunning domes that promise to elevate your dessert game. Dive in today for a delightful experience that you—and your guests—won’t soon forget.
Pistachio & Raspberry Cheesecake Domes
Ingredients
For the Raspberry Insert
- 150 g fresh or frozen raspberries Juicy bursts of tartness that cut through the sweetness.
- 2 tbsp sugar Bringing a measure of sweetness to the fruit’s tart essence.
- 1 tbsp lemon juice Enhancing flavors and introducing a zesty brightness.
- 1 1/2 tsp gelatin (or agar for vegetarian version) Ensuring the perfect set for the cheesecake base.
- 1 tbsp water Essential for activating gelatin’s gelling properties.
For the Cheesecake Mixture
- 200 g cream cheese Fresh, creamy, and velvety, a perfect base that melts in your mouth.
- 80 g pistachio paste Aromatic and nutty, this vibrant green paste deepens the flavor profile.
- 1 tsp vanilla extract Adding warmth and depth to the otherwise bright flavors.
- 100 g white chocolate, melted Rich and smooth, imparting sweetness and a delicate texture.
- 50 ml heavy cream Silky and luscious, providing a lightness that balances richness.
For the Glaze
- 200 g white chocolate For glazing, creating a luxurious coating on each dome.
- 100 ml heavy cream (for glaze) To enrich the glaze and give it a silky finish.
- 2 tbsp pistachio paste (for glaze) Adding flavor that ties the cheesecake back to its nutty roots.
- Green gel coloring (optional) For that extra pop of color, giving the glaze a stunning visual appeal.
Decoration
- Fresh raspberries To garnish, providing a vibrant, fresh touch.
- Whole pistachios For decoration and added crunch.
- Powdered sugar A dusting to enhance the presentation.
- Thin shortbread or sable breton cookies A crunchy base that provides texture beneath the creamy domes.
- Raspberry jam (optional, for extra layer beneath dome) For a delightful surprise at the base.
Instructions
Preparation of Raspberry Insert
- Begin by heating the raspberries in a saucepan over medium heat.
- Add sugar and lemon juice, stirring until fully combined.
- Once the mixture bubbles, dissolve the bloomed gelatin into it.
- Pour this vibrant puree into small silicone molds, then transfer them to the freezer.
- Allow them to freeze completely until firm—about three hours or overnight for best results.
Blend Cheesecake Mixture
- In a mixing bowl, combine the cream cheese, pistachio paste, vanilla extract, and melted white chocolate.
- Use an electric mixer for a few minutes to achieve a smooth, creamy consistency.
- In a separate bowl, whip the heavy cream until it forms soft peaks, then gently fold it into the cheesecake mixture, preserving the airiness.
Assemble the Domes
- Pour a layer of the pistachio cheesecake mixture into the dome molds, filling them halfway.
- Take the frozen raspberry inserts from the freezer and press them gently into the center of each mold, ensuring they are well positioned.
- Fill the remainder of each mold with cheesecake mixture and smooth the tops.
- Return the molds to the freezer and allow to set completely for at least four hours or overnight.
Prepare the Glaze
- In a saucepan, heat the heavy cream gently.
- Once simmering, remove from heat and stir in the white chocolate and pistachio paste until it’s completely melted and smooth.
- If you desire more vibrancy, add a few drops of green gel coloring.
- Allow the glaze to cool to about 35°C before pouring over the unmolded domes.
Unmold and Glaze
- Carefully release the frozen domes from their molds, placing them on a prepared shortbread base.
- Once all the domes are unmolded, pour the cooled glaze over each one immediately, allowing it to cascade down the sides beautifully.
Decoration
- Adorn each dome with fresh raspberries, a sprinkle of whole pistachios for added crunch, and delicate dots of pistachio cream.
- If desired, dust with powdered sugar to create a whimsical effect.
- For an added layer of flavor, spread a little raspberry jam on the shortbread base before placing the dome.